SSH key authentication with PuTTY
This post is intended to document procedures which can be used to simplify and increase security of remote login procedures to UNIX systems through use of SSH private and public keys.
PuTTY for Windows
PuTTY includes a full suite of programs in addition to the PuTTY executable itself. The top of the download page describes the purpose of each tool. We’ll use 3 of those tools in this process.
Creating an SSH private key
PuTTYgen is used for this step. Use the “Generate” button and follow the instructions.
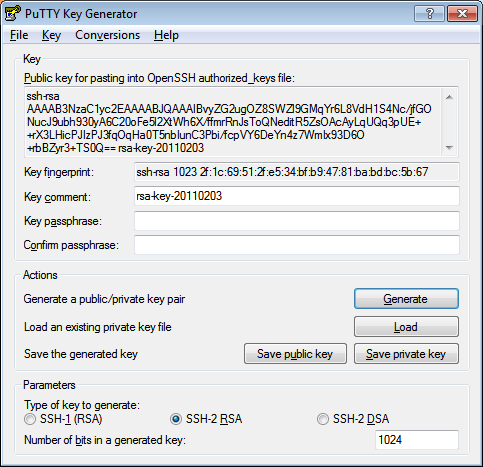
You can choose RSA or DSA key types, and you can change the key size.
Enter a passphrase and “Save private key” somewhere on your local system. Note: Use a passphrase that you can remember but that is stronger than a normal password. Security people usually suggest using whole sentences or combinations of words/phrases. Later we’ll configure another program so that you don’t have to type this passphrase very often.
Installing the public key on the remote system
There are various ways to do this, but the PuTTYgen window explains what I’ve found to be the easiest. That is, copy the text from the Key text area at the top of the window and manually add it to the $HOME/.ssh/authorized_keys file on the remote system. authorized_keys can contain multiple lines, one for each public key you wish to allow to connect to the remote system as your user.
The authorized_keys file probably doesn’t yet exist, and the .ssh directory may or may not. (The same directory is where ssh places the known_hosts file that contains the public keys for hosts which you have trusted for ssh connections in the past.)
If either doesn’t exist and has to be created, ensure that the permissions are as follows
[user@server:/home/user] ls -al .ssh
total 56
drwx------   2 user   staff           256 Aug 22 16:02 .
drwxr-x---   3 user   staff          4096 Sep 03 06:06 ..
-rw-------   1 user   staff           606 Aug 22 16:03 authorized_keys
Each line in authorized_keys can also be configured with further options, including restricting a key’s use to specific hosts, for instance. The best documentation I found on those options is at this Free BSD man page.
You can, and probably will want to, install the exact same public key on each system on which you want to use key-based authentication.
Using the key pair to login with puTTY
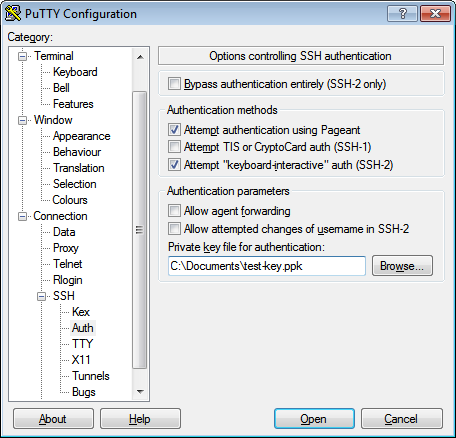
This is the “manual” approach, which isn’t necessary if you follow the next step, but I wanted to document it for completeness. Here we explicitly tell a PuTTY session that we’ll be authenticating with the private key file we saved earlier.
If you use this approach, when you connect to the remote system, you’ll be prompted to enter your private key’s passphrase:
*******************************************************************************
*                                                                             *
*  Welcome message                                                            *
*                                                                             *
*******************************************************************************
Authenticating with public key "rsa-key-20110203"
Passphrase for key "rsa-key-20110203":
You could argue that’s actually worse usability than the user ID/password solution since you’ll be typing a much longer passphrase, which is where the next step comes in handy.
Automatic key usage with Pageant
Another of the PuTTY programs, Pageant, can act as an agent providing access to private keys and only requiring you to authenticate once for each key.
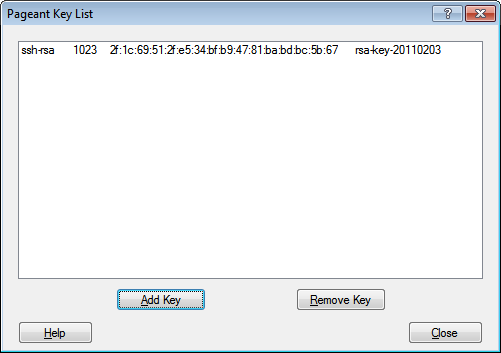
Once you’ve added this key file to Pageant and entered your passphrase there, you can leave Pageant running, and all the PuTTY programs will be able to authenticate with your key without your further involvement. In fact, with Pageant running, any attempts to connect to a host which trusts your key will automatically connect even if you haven’t explicitly configured your PuTTY session to use key authentication. (See the default, enabled “Attempt authentication using Pageant” checkbox in the above PuTTY screenshot.)
Furthermore, the Pageant tray icon can actually be used to directly launch any saved PuTTY sessions you’ve created. Right-click on the tray icon and select “Saved Sessions”.
Finally, you can use the command-line to pass to Pageant any private keys you want it to automatically load when it starts. This allows you to create a shortcut icon that will prompt you for the necessary passphrases and then start a copy of Pageant ready to be used for subsequent, key-authenticated SSH sessions:
PAGEANT.EXE test-key.ppk
Notes
- The private key’s passphrase (and a locked workstation) is all that stands between an intruder and your remote logins. As such, the passphrase needs to be non-trivial, and if you’re using Pageant, lock your workstation obsessively.
- WinSCP can be configured very similarly to puTTY.